10 Tips for Creating Better Cinemagraphs
This post is also available in: Deutsch (German)
One of the best ways to learn a craft is by tapping into the experience and knowledge of a specialist. To help you master the art of the cinemagraph, gallereplay co-founder Lydia Dietsch has compiled her top 10 tips for creating better cinemagraphs.
1. Movement, Movement, Movement!
Cinemagraphs—a portmanteau of the words cinema and photographs—are often referred to as “living photos.” The word “living” is instrumental because it is precisely the cinematic movement in the picture that gives the medium its name. This is what makes them so engaging. Therefore, a cinemagraph with minimal, uninspired movement will certainly leave less of a positive impression upon the viewer.
Movement is what gives a cinemagraph its special atmosphere.
2. What to Consider When Selecting Your Motion Element
For photographers who are just entering the world of cinemagraphs, there’s one question that always needs clarification: which element of the cinemagraph should be in motion and where exactly? You will develop an intuition for this over time. But, in general, keep in mind the following: large scale movement in the background does a nice job of highlighting objects in the foreground; for product shots, it’s best if the product itself is in motion. In any case, you should always decide with purpose which part of the cinemagraph will be in motion. Do not incorporate motion into your image just for the sake of adhering to the technical specifications of a cinemagraph.
The product originates from the product itself, hereby drawing attention to the bottle.
3. Mask Cleanly
 The mask (in this case highlighted in red for emphasis) must adapt to the object and be placed precisly around the edges. In this example the mask has a soft edge of only a few pixels.
Masking is one of the most important aspects of post-production. It becomes especially important when you intend an element in the foreground to be static, with a lot of movement behind it—or vice versa. It’s imperative to ensure that the foregrounded element is neatly “cut out.” If the edges of an object are blurred, due to an open aperture for example, a soft edge should also be applied when cutting out the object.
4. Meaningful Division of Stasis and Movement
When drawing the line between motion and static elements in a cinemagraph, it’s important to do so logically. When I started making cinemagraphs three years ago, I struggled with this a bit. Today, it is almost intuitive. Allow me to illustrate my point: if you’re creating a cinemagraph of water in a pool, why should the water only move on the left side of the pool, but never the right? The movement looks artificial and compromises the integrity of the image. To avoid this, I would recommend creating a division of stasis and motion between objects that are very different from one another or already have very clear boundaries in the image.
A good example from Yuki Ashida of the meaningful separation between motion and static elements.
5. Length of the Cinemagraph
One major advantage of cinemagraphs is that they are very short in duration and quite small in terms of file size. This makes them ideal for websites. As a cinemagraph creator, you should keep the length of the video as short as possible, but just long enough to ensure that the content doesn’t look unnatural. For example, a cinemagraph of a car moving through the frame would benefit immensely from a pause of one to two seconds before it reenters the image.
Despite the fact that the scene lasts for just a few seconds, it does not seem unnatural. In order to keep the video short, FLoris reintroduces the line of moving cars before they have fully exited the picture.
6. Loop with Skill
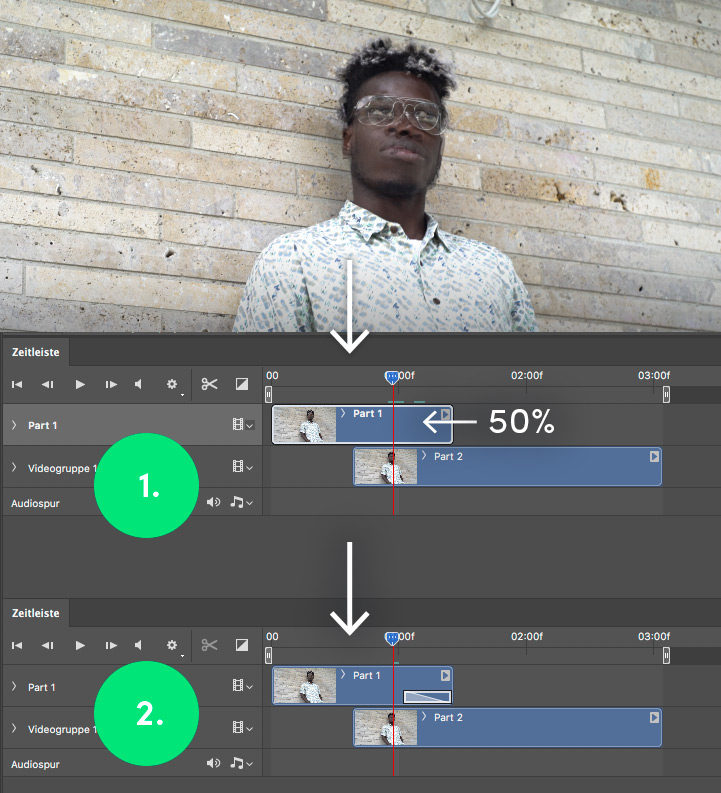
 The transition should take place between two similar planes.
When it comes to endless looping, it is important to ensure that the transition is seamless and undetectable, and that the movements do not seem robotic. When cross-fading, this can be done by superimposing a spot where the frames of both videos resemble each other. A simple trick is to reduce the upper video on the timeline to higher transparency and to position the bottom video at a point where both images are quite similar. Then set the opacity of the top layer back to 100% and apply the effect. If you choose to apply a forward-backward effect (also known as “bouncing loop”), slowing down the movement at the point of inflection might help. You can read more about endless looping in Photoshop here.
7. Learn the Rules of Photography
The more familiar you are with the rules of photography, the better your “living photos” will become. There are no exceptions here. Perspective, colors, composition, depth of field, and so forth—these concepts are all integral to creating top-notch cinemagraphs! To go fully in depth on this topic would go beyond the scope of this article, so I will focus instead on one element: perspective.
 Perspective is just one of many photography techniques one should master when creating cinemagraphs.
Here are some common questions you should keep in mind in terms of perspective. How close can you get to the main subject? Get creative here! Are there any elements nearby that can be placed out of focus in the foreground? Are there any elements in the image that are irrelevant to the concept? If so, consider moving them slightly to the side, or repositioning yourself. Have you thought carefully about the height from which you will take the picture and why?
8. Learn the Rules of Video
When I first started making cinemagraphs, I was overwhelmed by the idea of having to deal with video. However, I learned the most important rules quickly, including, for example, the correct camera settings. Most importantly, if the exposure time is not set twice as high as the frame rate, this can result in choppy movement (e.g. 25 fps = 1 / 50s exposure time). Also, the frame rate should be at least 24 fps, and the export settings of the final cinemagraph should match this to avoid a black frame at the end of the video.
Incorrect camera settings can result in choppy movement.
9. Stay Technically Up-To-Date
4K resolution is quickly becoming the new standard. 4K cinemagraphs can be displayed on a screen much larger than Full HD. Alternatively they can be displayed on a Full HD screen, but will appear sharper than Full HD quality cinemagraphs, due to the higher frequency of pixels. It’s a shame when great cinemagraph concepts lose their impact because the camera can only record in substandard quality. In this regard, it would behoove you to pay close attention to video quality and to invest in good, state-of-the-art equipment.
10. Constantly Reinvent Yourself
German cartoonist Joscha Sauer once said, “Nobody can sit in a dark room and be inspired.” It’s so true! Find your own way to come up with new, creative ideas and get inspired. Sometimes simply changing the environment in which you work can be helpful. Try contemplating ideas related to your work while taking a walk. It also helps to keep an eye on what’s going on within the world of cinemagraphs and how it is evolving. Don’t be afraid to try new things! And don’t let excuses prevent you from constantly creating new cinemagraphs!
And last, but not least: don’t forget to become a gallereplayer! We look at each cinemagraph you submit and provide constructive, helpful feedback that will allow you to evolve as an artist over time. If you have any questions regarding my tips, feel free to send me an e-mail.

