
How to Edit Videos in Photoshop as If They Were Still Images
This post is also available in: Deutsch (German)
You occasionally buy stock photos and enjoy tweaking the colors, cropping and editing the image, but aren’t sure how to do the same with videos? This article explains how to apply all the functions that you’re used to from editing photos in Adobe Photoshop, to video files.
In principle it’s easy: open the video in Photoshop, convert to a smart object if necessary, edit as if it were a photo and export via the “timeline” control panel. All the functionality that can be applied to photos in Photoshop, can also be applied to videos. This makes Photoshop an exceptionally powerful tool when it comes to post-production and moving images.
A few years back, before I co-founded gallereplay, photo-editing was of one my daily duties as a full-time graphic designer. When I discovered cinemagraphs, I was eager to produce them myself, but since I hadn’t worked with video before, I remember feeling a little intimidated upon realising that they were in fact mp4 files. Upon closer inspection, I realised that there is no reason for concern.
1. Basic Video Post-Production in Adobe Photoshop CC
An easy-to-use but often-ignored function in Photoshop is the timeline. When opening an mp4 file in Photoshop, the timeline will immediately display the video layer and its length. One important thing to note is that edits aren’t applied directly to the image, since this will only affect individual frames. Instead there are two ways to apply effects:
1. Creating individual layers, for example fill or adjustment layers, in the layers control panel. This approach is a best practice for photo editing too, since it is not recommended to make changes directly to the image itself. Afterwards go to your timeline and extend your new layer, making it as long as your video:
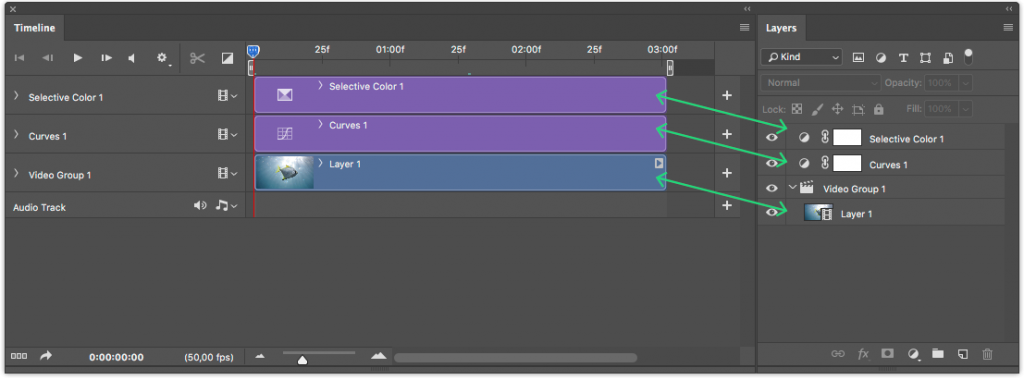
The timeline in Photoshop shows the layers (also visible in the Layers panel) and their length. When adding adjustment layers, it’s important that all layers on the timeline are of equal length.
2. Converting the video to a smart object, by either selecting Layer > Smart Object > Convert to Smart Object from the menu, or right-clicking on the name of the layer in the layers control panel, and clicking “Convert to Smart Object”. After doing so, you will be able to apply any Photoshop filter, which will be applied to the entire video. The Camera Raw Filter (Filter > Camera Raw Filter) is a popular choice since it provides a range of options for editing sharpness, color, contrast, noise reduction, lense correction and more. Other filters including the liquify filter, adaptive wide angle, blurs and sharpening can be applied in the same way. All changes to the smart object can be corrected or tweaked later. Another useful feature: within the filter effects mask of the smart object the user can define, which section of the video the changes should be applied to.
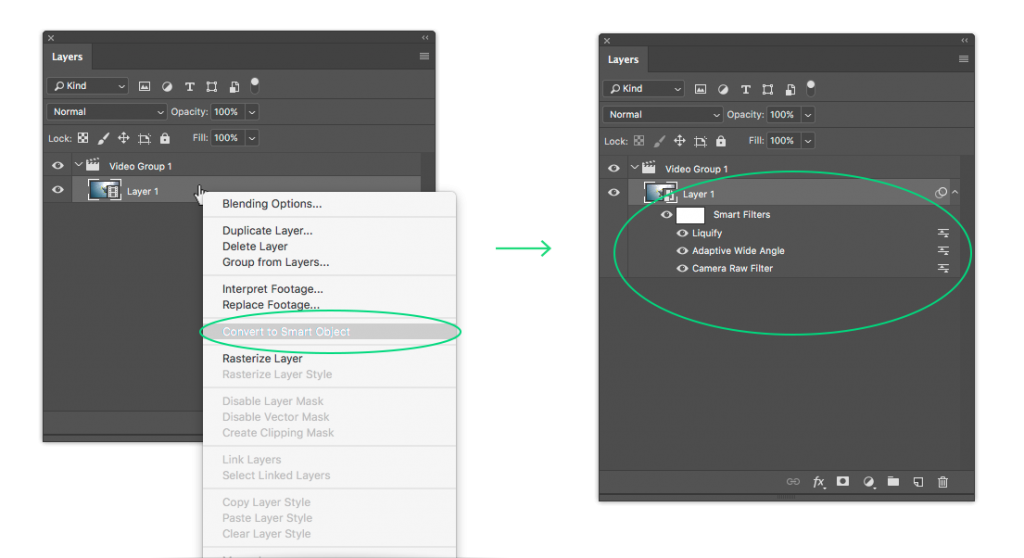
After converting a layer in the Layers panel into a smart object, filters can easily be applied to an entire video.
Often it’s a combination of these two methods, which leads to an infinite number of post-production possibilities and the best results. In case you’re already satisfied with the result, you can now export the video (see 4: Exporting Your Video).
2. Cropping, Masking, Transforming and Warping
So we now know how to apply filters and fill or adjustment layers. If we now wish to mask or crop certain areas, the process is the same as with photos. For example: we can crop using the Crop tool (shortcut “C”), or add a mask to the video layer by clicking the “Add Layer Mask” button in the layers panel. If we wish to transform or warp, the process is equally unproblematic. Just make sure that you have converted the video to a smart object before proceeding in the manner that you’re used to from editing photos.
Transforming, cropping, masking, warping and many other functions can be applied to a video in Photoshop, in the same way that they can be applied to a photograph.
3. Using the Clone Stamp Tool on a Video Layer
By applying a little trick, it’s even possible to emulate the clone stamp tool. For instance: let’s say you have a dark spot in your video, which needs to be removed. When editing a photograph you might use the clone stamp tool and grab a clean section of the image to paint over the problematic dark spot. The following process can be used to the same effect on a video layer: copy your video layer and position a clean spot in the copied layer above your dark spot. Lower the opacity of the copied layer to 50% temporarily, making it easier to position. Once it has been placed correctly, increase the opacity back to 100% and fade out the layer with a black mask by adding a layer mask and filling it in with black. Now use the paintbrush tool with white color and carefully paint over the problem area (ensure the layer mask is selected). Done! Here we must again make sure that the layers on the timeline have the exact same length.
This video shows how to easily remove blemishes from video footage by emulating the clone stamp tool in Photoshop.
4. Exporting Your Video
Once you’re done editing, you can export your video by selecting File > Export > Render Video from the menu, or clicking the “Render Video” button at the bottom of the timeline. You can now select the location that you want to save the file to and define the video quality. For general use on the web (social media, Vimeo, Youtube), I recommend using the H.264 codec, along with the HD 1080p 25 Preset. Select “Document Size” in the “Size” field, to match your document’s resolution. The same applies to the frame rate as well: select “Document Frame Rate” since changing the frame rate to differ from that of the timeline can lead to black frames appearing in your video. If you’d prefer to work with an export preset in order to get the optimal balance between small file-size and high image quality, you can download our preset here. Once downloaded, place it in the Photoshop application folder under Presets > Video > Adobe Media Encoder > H264 and then restart Photoshop. The preset should now appear amongst the options for the “H264” format.
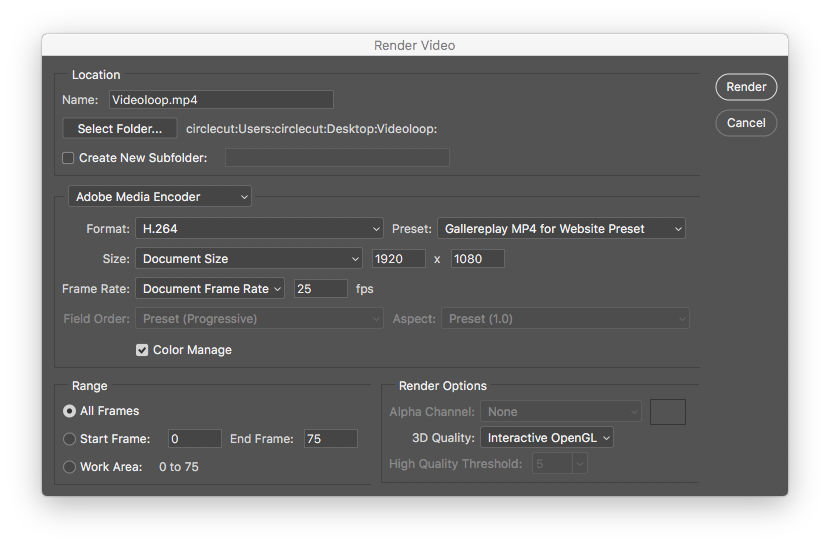
Exporting a video file is particularly easy when using a preset.
As you can see: video editing with Adobe Photoshop is only a stone’s throw away from photo editing. If you’d like to try it for yourself, then you can download a free video loop to practice with at the bottom of our blogpost “Size Matters: How to Boost Engagement Without Slowing Down Your Site”. In case you’re planning on using micro-videos on social media, then this article explains how to do so.
