Atmospheric Particles with “CC Particle Systems II” – Animating Photos with After Effects
This post is also available in: Deutsch (German)
Animated photos are a popular alternative to video based cinemagraphs. They offer the possibility to bring even still images alive. One of the most popular programs for this is the post-production and animation program Adobe After Effects. In this first part of my two part series of AE tutorials I give an introduction to the program and explain the commonly used floating dust particle effect, which you can use in your photos to transform them into loop videos.
 In contrast to Adobe Photoshop, which primarily introduces itself as a photo editing program, and Adobe Premiere, of which the focus lies on video editing, Adobe After Effects is a composting and animation software. It is used to produce visual effects (vfx), motion graphics and animations. If desired it can also be combined with camera produced content. In many areas there are similarities with fellow Adobe suite programs Photoshop and Premiere, meaning that it will be easy to adapt if you have prior knowledge with either of them.
- The Effect “CC Particle Systems II”
- Creation of the Composition and Layers
- Adjustment of the Effect
- Last Changes, Transformation into a Loop Video and Rendering
The Effect “CC Particle Systems II”
In the following software tutorial we will look at the particle system, one of the many fundamental tools of the program which enable us to produce animations. I will explain this by creating an atmospheric dust effect. By changing the parameter you can also produce further effects with the volumetric particles such as snow or rain.
The program offers many possibilities for creating particles. Below we will look at the tool “CC Particle Systems II”, which I recommend for the creation of the pollen. As the name suggests, one can produce particles with the effect and adjust them using various parameters. For example, the size, the type of particle, the speed or direction. Here, for instance, we are able to build big, flaky particles like snow, which sink to the floor, or small ones that float through the air.
Creation of the Composition and Layers
This way the composition is created with the correct settings, the pictures are imported and the volumetric particle effect is applied.
-
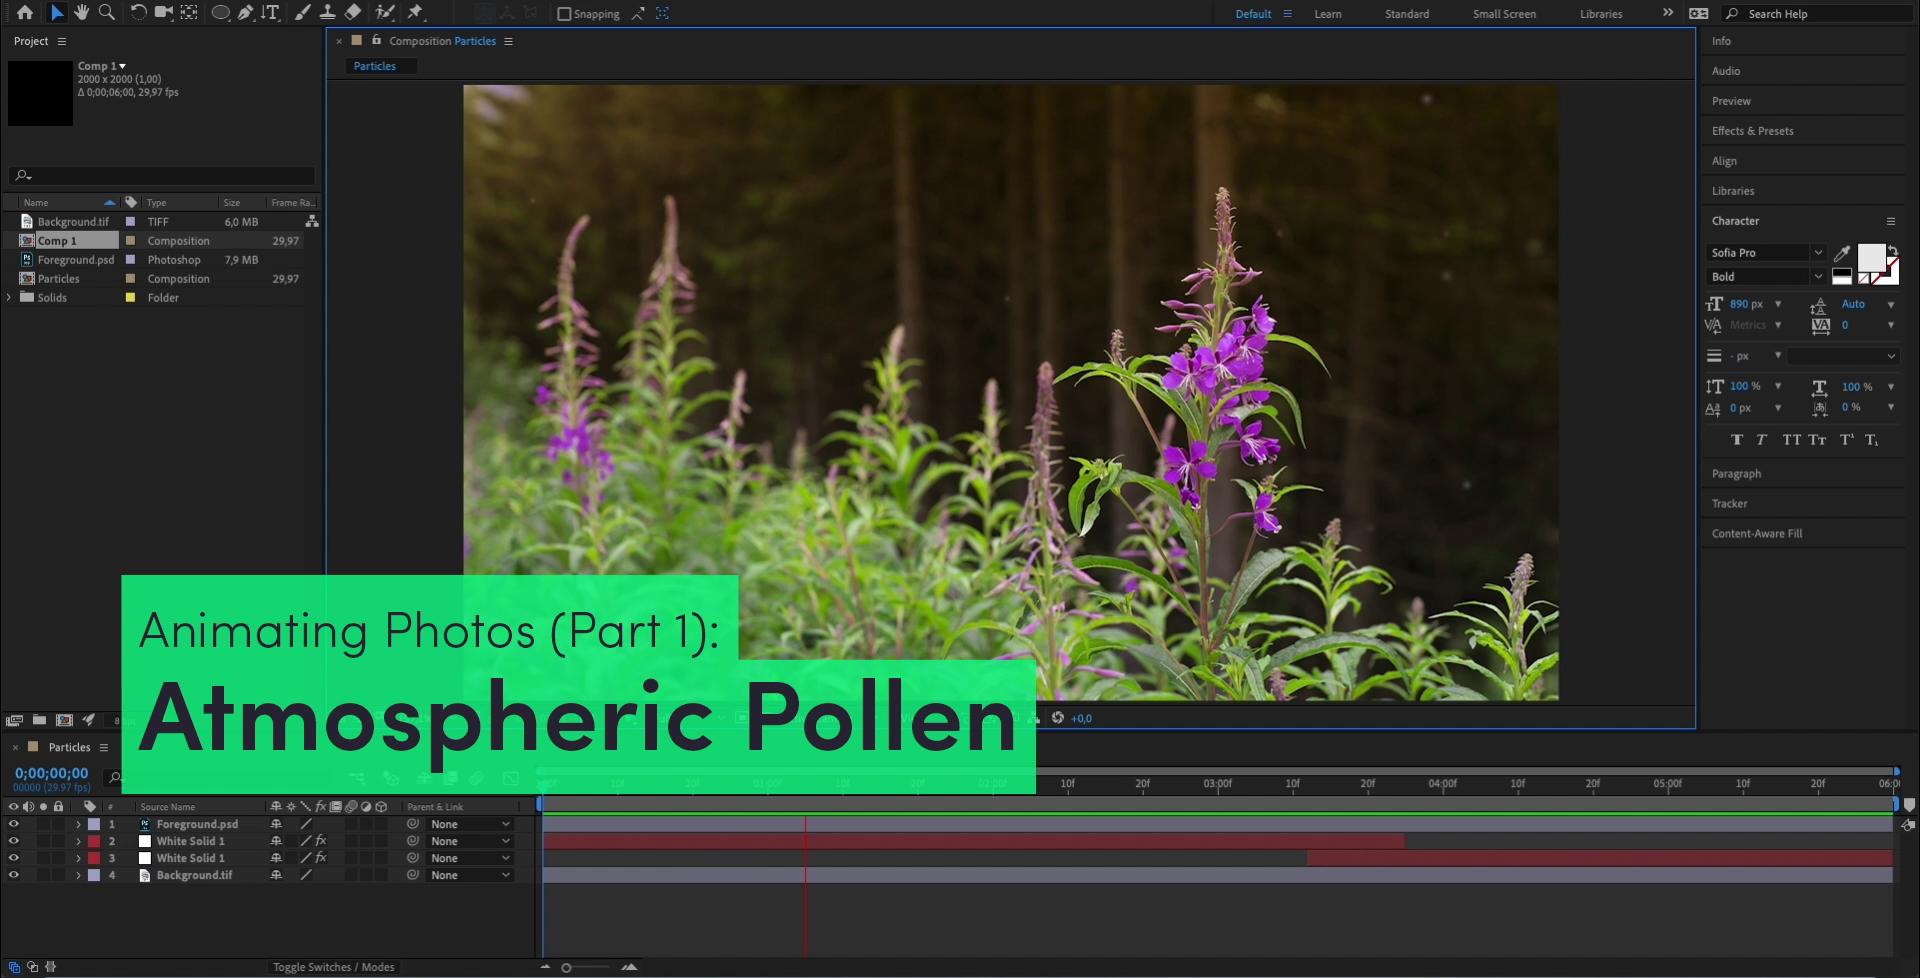
First we create a composition in our desired size: in our case it is Full HD (1920×1080 Pixel). Alongside the frame rate (29,97 fps) and other settings, we decide on the length of the composition. I decided to create a 6 second Loop Video.
-
Subsequently we import the photo, which we would like to use for the particle animation. We can do this by double clicking the “Project” window and selecting our file. For me, two images were prepared in Photoshop: the background layer on which the effect would be used and a masked layer on which no particles should move.
-
Next we drag this/ these layer(s) into our composition window next to the timeline.
-
Now we create a solid area to which the particle generator will be applied. We do this by clicking above in the menu on “Layer” > “New” > “Solid…”. In the dialog window that will open, we can ensure the correct size of the solid layer by the button “Make Comp Size” and also choose a color, which our particles should later have. In our case we have decided upon white (#FFFFFF). Then click “OK”. Call this layer “Particles” and leave it at first over our masked layer in order to see the particles clearly during the adjustment.
-
Now we can use our particle emitter. To do this, we can either go to the menu item, “Effects > “Simulation” > “CC Particle Systems II”, or by double clicking on the effect “CC Particle Systems II” in the “Effects & Presets” panel. This can be activated by the menu item “Window”, should it not be open.
Adjustment of the Effect
Now it is time to influence the emitter through the operating panel “Effect Controls”, which already has been opened. In the following, I will give you some recommendations for the settings. However, it might be worth playing around with it as the adjustment also depends on the picture to which you integrate the pollen. You can view the effect anytime by pressing the spacebar.
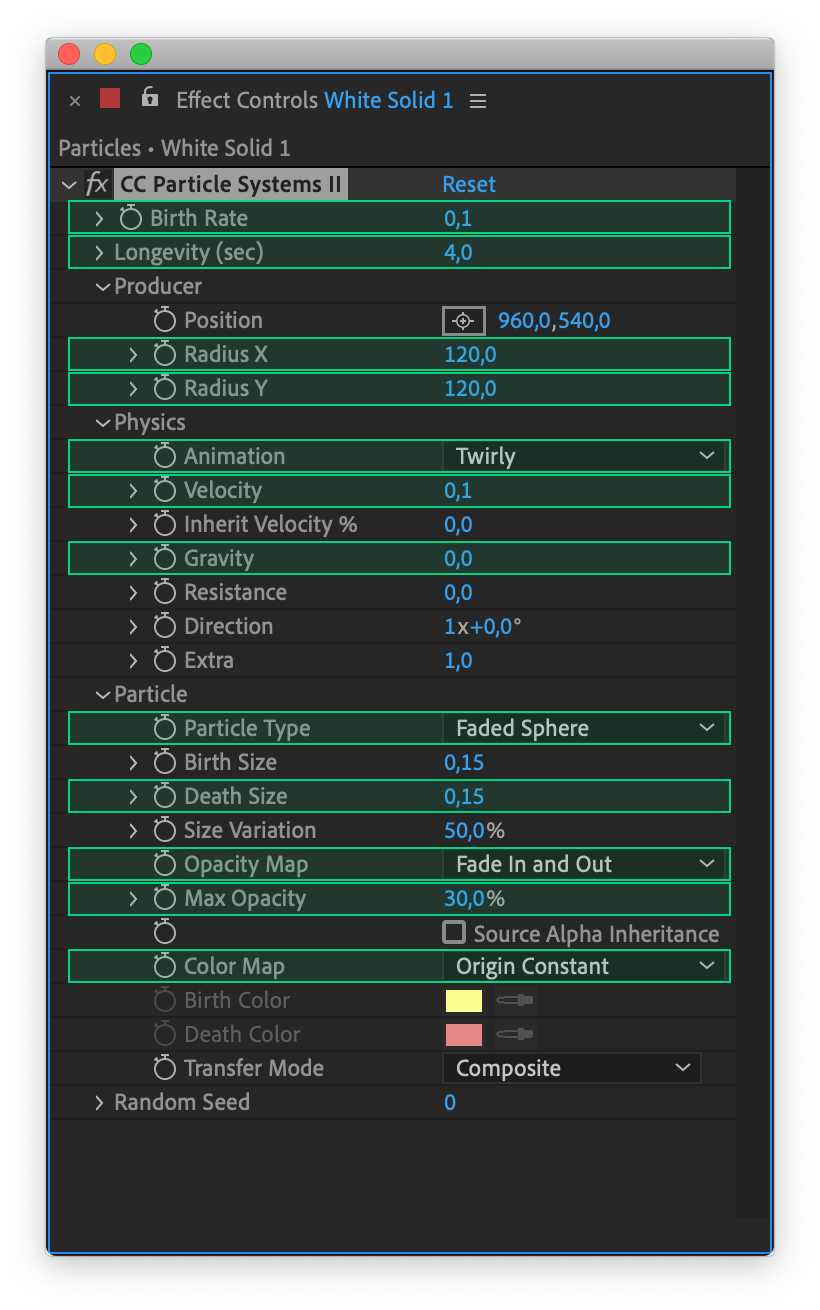 I recommend using these adjustments after the application of the effect.
Producer
Radius X: 120
Radius Y: 120
Through this change we will enlarge the emitter and spread the particles over the whole image.
Particle
Particle Type: Faded Sphere
Death Size: 0,15
Opacity Map: Fade In and Out
Max Opacity: 30,0%
Color Map: Origin Constant
This change will lead to the optimal adjustment of the particles. The type of particle will be changed by making it smaller, leaving it to blend in and out, reducing its opacity and ensuring it takes on the color of the solid layer (white). The other settings already have the fitting values by default.
Physics
Animation: Twirly
Velocity: 0,1 (lower values are also possible here e.g. 0,05)
Gravity: 0,0
Here we change the type of movement and ensure that the particles move slowly and are not pulled down by the source of gravity, but instead are carried around freely by the wind.
Birth Rate: 0,1
Longevity (sec): 4 (any values can be entered into this input field)
Through the adjustment of these controls we reduce the number of particles and give each of them a 4 second life time.
Last Changes, Transformation into a Loop Video and Rendering
How to optimise a video and convert into a loop video
Next we split the solid layer at the 4th second (Ctrl+Shift+D on Windows, Cmd+Shift+D on Mac) and delete the front part. We move the back part to the beginning of the timeline. Then we extend this layer until the end of the timeline. If the steps are followed correctly, the particles will have already appeared at the beginning of the timeline.
Then we move our effect layer under the masked layer (if this exists), so that the effect will not be used all over the image. Whoever already knows After Effects, can of course create masks directly in the program.
To optimize the video for the endless loop, we split the layer with the effect again in the middle (Ctrl+Shift+D/ Cmd+Shift+D) and then move the layer that’s located higher, from the end of the timeline to the beginning of the timeline, and move the layer at the beginning of the timeline to the end, i.e. we swap the two parts. Then we extend the upper layer to the right for about 1 second. In the scope of this newly created overlap we blend in the upper video and show the lower video. We do this by “Transform” > “Opacity” (see below video).
The atmospheric particle animation is finished! You can now prepare your video for render by the menu item “File” > “Export” > “Add to Render Queue”.
When you have selected your storage location and export settings, you can click “Render” to export your video.
And that is our result:
